This page describes the way this web site has evolved and how it was designed. Readability and simplicity of the content are the prime movers of its development.
This article describes this website as it was designed several years ago. It has changed a lot since and this description is not valid any longer.
From inception, readability and simplicity have been the prime movers of this site. It has evolved quite a bit since then. The site is PHP-driven.
PHP drives the site. Its choice was the result of the search I made to find a menu system. I found one developed by Marco Pratesi [. It used PHP and Javascript and I decided to use them. Additionally, PHP is a free server-side scripting language which can be embedded in HTML code and cannot be disabled by the user.
The site also provides some interactivity with the user. The color theme and the font-size can be modified by the user. It provides a print button that expands the text and presents the user with a display that is exactly what the print out will look like.
The site is bilingual. Some pages are in english with the suffix "_e", some are in french with the suffix "_f" and some are bilingual. The "Home" page and the default page in each folder of the site are bilingual and called index.php (without any suffix).
Web design
Web design is the skill of creating presentations of content by way of a Web browser. Its objective is to create a Web site from a collection of electronic documents residing on a Web server. The result must be attractive, useful and easy to use but the key feature of modern web design is simplicity.
This site separates design and content. In fact, this site is wrapped in a PHP shell that takes control and provides all the capabilities for the page to be dynamic (using Javascript code generated by PHP) as well as all the definitions that are needed for the dynamic-CSS code to format the content. Content is dealt with separately in a standard HTML environment and it is "templated" into the page by the PHP shell using the PHPLIB template system.
As a result, for each page of the site, PHP code is located in a "code" files with the .php extension. The content is located in a template file with the same name but with the .html extension. The CSS file is called gtrolayout.php: it contains CSS code with embedded PHP code that is parsed and embedded in the <head> section of the page.
Designing each page
Suppose that I want to create a new page that I call "mypage". I will need to generate two files: mypage_e.php and mypage_e.html if the pages are in english. The following code is representative of the this file.
<!DOCTYPE html>
<html>
<head>
  <title>Title</title>
<?php
  $RootDir = $_SERVER['DOCUMENT_ROOT']; 	// path to root folder
  $myIncPath = $RootDir . '/include/';	  // path to include folder
  $Rate = 0;                              // = 1 => displays a warning
  $UnderConstruction = 1;                 // displays "under construction"
  $Keywords = "";                         // generating <meta NAME="keywords" CONTENT="">
  $Description = "";                      // generating <meta NAME="description" CONTENT="">
  # generating the page
  include $myIncPath . "top.inc.php";		 // generates the page header and template content
  include $myIncPath . "bottom.inc.php";  // generates the page footer
?>
This file defines the HTML convention that will be used. The <html> and <head> tags follow. The <title> tag is defined as "My page". PHP variables are defined and PHP begins its work including the PHP code contained in top.inc.php. Once this code has been executed, the header of the page is displayed and all the parameters are set for the code of bottom.inc.php to "template" the content and display the page footer. The code of the template file follows:
<!DOCTYPE html>
<html>
<head>
<title>Blank</title>
</head>
<body>
<!-- BEGIN texte --> <!-- defines the beginning of the content -->
<div class="title">My page</div> <!-- title of the content -->
<p> </p> <!-- Insert content here -->
<!-- END texte --> <!-- defines the end of the content -->
</body>
</html>Any statements that precede the <!--- BEGIN texte ---> or follow the <!--- END texte ---> statement are irrelevant as the template system will display only the statements between these tags.
Details of the code
Up to now, I have outlined the general principles on which the site is based. Now let's get into the details of the program. As mentioned above, each page consists of two files: one with the .php extension and the other with the .html extension that contain the PHP code and the content respectively. This is where page-specific data in initialized.
The code file includes two companion files called top.inc.php and bottom.inc.php that use the page-specific data to generate the page itself in a way that is consistent from page to page.
What does top.inc.php do?
The top.inc.php companion file is called immediately after the variables needed for the page have been set. Its main objective is to prepare the parameters needed by the page and display the header. We will see what it does step by step in the forthcoming sections.
Setting paths and include files
In the MyPage_e.php file, a minimal definition of the directories required for the page to display has been made: $RootDir and $myIncPath are the paths of the root and the "include" folder on the server.
$FileName = $_SERVER['PHP_SELF'];     // path to the file on the server
$ScriptFile = basename($FileName);    // name of the file without path
$tplFile = @ereg_replace('.php', '.html', $ScriptFile); // name of the template file
$myDirPath = $RootDir . '/menus/';		// "menus" directory  (local)
$myWwwPath = '/menus/';               // "menus" directory (web)
$myWwwIncPath = '/include/';          // "include" directory (web)
$Previewing = 0;                      // used by printer friendly popup window

require_once $myIncPath . 'functions.php';
require_once $myIncPath . 'browser_detection.php';
require_once $myDirPath . 'lib/PHPLIB.php';
require_once $myDirPath . 'lib/layersmenu-common.inc.php';
require_once $myDirPath . 'lib/layersmenu.inc.php';
require_once $myDirPath . 'lib/treemenu.inc.php';
In this code snippet, several new variables are defined and several needed PHP files are inserted in the code. Two types of paths are defined: local and web paths. Local paths are required for the server to find files whereas the web paths are used to link files.
Implementation of accessibility features with dynamic CSS
 |
The user can interact with the page on the right hand side of the header of the page, a section that is shown here. It provides for the user to modify the presentation of the page on the screen (accessibility features) and for the user to print out the content of the page (discussed in the next section).
In order to improve readability, two accessibility features have been implemented: four color themes (blue, brown, red and teal) and three font size (12, 13 and 14 pt) that can be modified by the user by clicking on the four colored squares and three letters "A" of different size on the right-hand side of the page header.
On the first visit, the default color theme is "blue" whereas the default font size is 12 pt. Clicking on one of the squares will implement the selected color. Clicking on a letter will modify the font size. However, clicking on these features does more than that. It sets a cookie in the client browser so that the selection is remembered for 30 days.
This functionality is implemented by the set of queries shown below:
if (isset($_COOKIE['theme'])) // is cookie('theme') there?
  $Theme = $_COOKIE["theme"]; // set it
if (isset($_COOKIE['font'])) // is cookie('font') there?
  $Font_Size = $_COOKIE['font']; // // set it
if (isset($_GET['theme']))
{
  $Theme = $_GET['theme'];
  setcookie("theme", $Theme, time() + 60*60*24*30, "/");  // 30 days
}
if (isset($_GET['font']))
{
  $Font_Size = $_GET['font'];
  setcookie("font", $Font_Size, time() + 60*60*24*30, "/"); // 30 days

ob_end_flush();	// turns output buffering off if any
In addition, the implementation requires the use of a style sheet that will respond to the modifications made interactively by the user: it means that the style sheet that controls the presentation of the page must be dynamic and programs in PHP since CSS does not support variables. It is called gtrolayout.php and looks like this:
<?php
if (isset($_COOKIE['theme'])) // is cookie('theme') there?
  $Theme = $_COOKIE["theme"]; // set it
else $Theme = 'blue';
if (isset($_COOKIE['font'])) // is cookie('font') there?
 $Font_Size = $_COOKIE['font']; // // set it
else $Font_Size = '12';
if ($Theme == 'teal')
  $Colors = array('#006633', '#66cc99', '#99ffcc');
if ($Theme == 'blue')
  $Colors = array('#0000ff', '#6666ff', '#ccccff');
if ($Theme == 'brown')
  $Colors = array('#663300', '#cc9966', '#ffcc99');
if ($Theme == 'red')
  $Colors = array('#FF0000', '#ff6666', '#ffcccc');
?>

...

#container
{
  width: 90%;
  margin: 10 auto;
  text-align: left;
  border: 5px solid <?php echo  $Colors[0] ?>;
  -moz-border-radius: 15px;
  border-radius: 15px;
  overflow: hidden;
  background: url(../include/images/back.jpg);
}
...
It is linked to the page in the <head> section of the page: its variables are initialized by the queries shown above and parsed to modify the presentation of the page on the screen.
If the cookies for the color theme and the font size have been activated in the browser cache, the file is initialized by the values stored in the cookies and parsed accordingly. Otherwise, the default color theme and font size are used.
The way this problem was solved can be found in the article entitled "Dynamic cascading style sheets - internal or external?" on this Web site.
Print preview popup window
Next to the links to the accessibility features on the right hand corner of the page header, there is a print icon that the user can click to view what the page will look like once printed. It is justified by the fact that some pages of this web site contained collapsed sections, i.e., sections of code that appeared too long to display but could be expanded with a click by the user if he wanted to investigate it. If the print button of the browser is used to perform the print, these collapsed sections will remain collapsed and will not be displayed on the printed copy. The details of the implementation of this feature are discussed in detail in the annex entitled "Print preview popup window".
Preparing the header of the page
The header of the page is prepared by the code that follows. This header takes three forms: english, french or bilingual. The first two are followed by a layers menu whereas the last one has no menu (a tree menu appears in the text of the page). The language used in the page is detected by analyzing the suffix in the name of the file and the language of the header is set accordingly.
$LString = '';
// $LString is  used to display an extra menu item if a translation of the page exists
if (@ereg('_e', $FileName)) // the page is in english
{
  $Language = 'en';
  $HeaderTitle = 'Georges\' Web Site';
  $OtherFileName = @ereg_replace('_e', '_f', $FileName);
  if (file_exists(basename($OtherFileName)))
    $LString = ".|FranÇais|" . $OtherFileName . "||shortcut_icon_phplm.png;";
}
elseif (@ereg('_f', $FileName)) // the page is in french
{
  $Language = 'fr';
  $HeaderTitle = 'Site Web de Georges';
  $OtherFileName = @ereg_replace('_f', '_e', $FileName);
  if (file_exists(basename($OtherFileName)))
    $LString = ".|English|" . $OtherFileName . "||shortcut_icon_phplm.png;";
}
else
{
  $Language = 'ot'; // the page is an index.php page
  $HeaderTitle = "Site Web de Georges<br>George's Web site";
  if ($FileName == '/index.php')
    $tplFile = @ereg_replace('.php', '_e.html', $ScriptFile);
}
The variable $LString has a special role: if a page exists both in english and in french, a menu item is added to the layers menu to link to its translation.
Displaying <meta> tags
Other than the title tag , information in the <head> section of a web page is not seen by those viewing the pages in browsers. However, meta information in this section is used to communicate information that a human visitor may not be concerned with. It provides information about the page to search engine robots so that the search engine can better understand what the site is about. Meta tags provide this information in a format that the web crawlers/spiders that visit your site can understand. In fact, the real intent of the meta information is to get a better ranking in the search engines.
On this site, some meta information is sent directly to the browser whereas of the information is set in the "code" file and passed to the browser as PHP variable values.
if (isset($Description))
print '<meta NAME="description" CONTENT="' . $Description . '"></meta>';
print '<meta http-equiv="content-type" content="text/html; charset=ISO-8859-1" />';
print '<meta name="author" content="Georges Trottier" />';
print '<meta name="company" content="GTRO" />'
if ($Language == "en")
  print '<meta NAME="language" CONTENT="en" />';
if ($Language == "fr")
  print '<meta NAME="language" CONTENT="fr" />';
print "\n";
if (isset($Keywords))
  print '<meta NAME="keywords" CONTENT="' . $Keywords . '"></meta>';
Added capabilities
Some anchors are used to produce tooltips as described in a separate article entitled "Tooltips". It uses CSS statements and the jQuery library to produce the tooltips. This methodology is also used to generate the arrows that appear on the right side of the page and provides it with a link to the top of the page. These are produced by inserting the placeholder {TOP} in the template text. The same library is used to show or hide parts of the content that were too long and would distract the reader.
Building the HTML template
This site uses the PHPLIB template system. In the code below, the template system is initialized.
require_once($myIncPath . "/template.inc");
if (isset($tplFile))
{
  $tpl = new Template(); // creates the template
  $tpl->debug = 0;
  $tpl->halt_on_error = "no";
  $tplFile = './templates/' . $tplFile;
  $tpl->set_file('main', $tplFile);
}
Preparing the menus
This site uses two menus: a layer menu and a tree menu, both downloaded from The PHP Layers Menu System. These menus, developed by Marco Pratesi, are driven by PHP and Javascript respectively on the server and on the client computer. A layer menu of the site appears on all pages of the site except on the "Home" index.php files. Tree menus are used on this page, one for the english content, one for the french content.
For each page, the preparation of the menu depends on the value of the $Language variable since there are two layers menu: one for the english and one for the french language content of the site.
if ($Language != 'ot')
{
  // Building the layers menu
  $mid = new LayersMenu();
  $mid->setDirs($myDirPath, $myWwwPath);
  $mid->setDownArrowImg('down-keramik.png');
  $mid->setForwardArrowImg('forward-keramik.png');
  // Select the template to be used for the first level menu of a horizontal menu.
  $mid->setHorizontalMenuTpl('gtrolayersmenu-horizontal_menu-keramik.ihtml');
  $mid->setSubMenuTpl('gtrolayersmenu-sub_menu-keramik.ihtml'); // end of addition
  if ($Language == 'en')
  {
    $mid->setMenuStructureFile($myDirPath . 'mysite.txt');
    if ( islocal() )
    {
      $mid->appendMenuStructureFile($myDirPath . 'local_e.txt');
    }
  }
  if ($Language == 'fr')
  {
    $mid->setMenuStructureFile($myDirPath . 'monsite.txt');
    if ( islocal() )
      $mid->appendMenuStructureFile($myDirPath . 'local_f.txt');
  }
  $mid->appendMenuStructureString($LocalMenuString);
  if ($LString != '')
  {
    $mid->appendMenuStructureString($LString);
  }
  $mid->setIconsize(16, 16); // must be before parseStructureForMenu
  $mid->parseStructureForMenu('hormenu1');
  $mid->newHorizontalMenu('hormenu1');
  $mid->printHeader();  // Displays the first layer of the menu
  }
  else
  {
  # Building the tree menu
  $treemid = new TreeMenu();
  $treemid->setDirs($myDirPath , $myWwwPath);
  $treemid->setMenuStructureFile($myDirPath . "mysite.txt");
  if ( islocal() )
  {
    $treemid->appendMenuStructureFile($myDirPath . 'local_e.txt');
  }
  $treemid->setIconsize(16, 16);
  $treemid->parseStructureForMenu('treemenu_e');
  $treemid->setSelectedItemByUrl('treemenu_e', basename(__FILE__));
  $treemid->setMenuStructureFile($myDirPath . "monsite.txt");
  if ( islocal() )
  {
    $treemid->appendMenuStructureFile($myDirPath . 'local_f.txt');
  }
  $treemid->setIconsize(16, 16);
  $treemid->parseStructureForMenu('treemenu_f');
  $treemid->setSelectedItemByUrl('treemenu_f', basename(__FILE__));
}
Note that the menu structure has been modified so that the all the formatting features of the menus are located in the gtrolayout.php file, a file that allows for dynamic production of an internal CSS file with the relevant values for the theme and the font size.
Header display
Now it is time to display the header and initiate the content of the page. The first statement includes the file header.inc.php that contains the layout of the header and displays the "under construction" image when the page is still under construction. Finally, it initiates the "content" division of the page.
include $myIncPath . 'header.inc.php';
UnderConstruction($UnderConstruction); // displays if argument true
print '<div id="content">';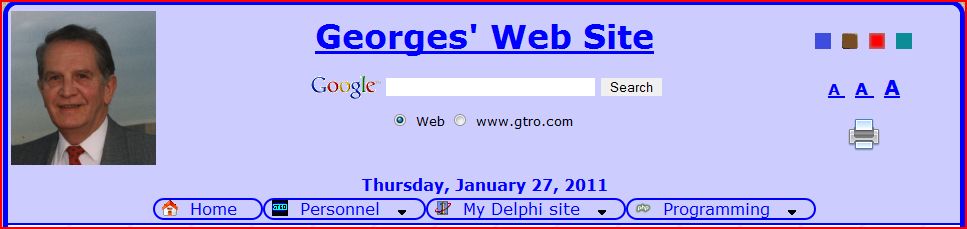 |
The picture shown above shows the display of the header (reduced in size) as it would show at this point of the program. On the left hand side, there is a dating picture of the author. In the center, the reference to the Web Site (Georges' Web Site) and a Google search. On the righ-hand side, there are icons that the user can click to activate the accessibility features (modify color theme and font size) or get a print preview of the page. Finally, you find the date and the header of the menu (at this point, the menu would not open and show its sub-menus).
What does bottom.inc.php do?
Now that all the preparation of the page parameters have been set and that the header has been displayed by top.inc.php, it is time for bottom.inc.php to generate the content of the page and its footer.
Enabling the template
During the execution of top.inc.php, the PHPLIB templated required for the display of the content have been prepared. Now, they are implemented. The placeholder is defined to execute the topofpage() PHP function which displays an arrow-up icon which, when clicked, returns the display to the top of the page.
The block "texte" is then defined so that only the text between <!--- BEGIN texte ---> and <!--- END texte" ---> in the content file will be displayed. The only drawback observed using these templates is that the size of the content must be smaller or equal to 65,535 or 216-1 bytes (which is a fairly long text).
if (isset($tplFile))
{
  $tpl->set_var('TOP', topofpage());
  if ($tpl->set_block('main', 'texte'))
    $tpl->pparse('out', 'texte');
}
Displaying the sub-menus and generating the footer
The code that follows does two things: it generates layers for the sub-menus and the footer of the page. The generation of the sub-menus is performed by the $mid->printFooter() statement. The rest has to do with the generation of the page footer that includes a way for the user to e-mail a comment as well as the display of the date the page was last modified.
if ($Language == 'en')
  {
    print '<div class="noprint">';
    $mid->printFooter(); // prints the code of the sub-menus
    print '</div class="noprint">';
    if ($Rate != 0)
      warning('en');
	   print "<center><table><tr><td align=\"center\">";
	   print "<a href=\"mailto:<my e-mail address>?subject=RE: ".$FileName."\">
      <img src=\"../images/rotating.gif\" alt=\"E-Mail\" align\"bottom\" border\"0\" />
      </a><br/>Any question or comment?	print "</td></td></table></center>";
    echo '<hr>';
    echo "Last modified: ".date( "F d Y H:i:s.", filemtime($tplFile) );
  }
if ($Language == 'fr')
  {
    print '<div class="noprint">';
    $mid->printFooter(); // prints the code of the sub-menus
    if> ($Rate != 0)
      warning('fr');
	   print "<a href=\"mailto:<my e-mail address>?subject=RE: ".$FileName."\">
      <img src=\"../images/rotating.gif\" alt=\"E-Mail\" align\"bottom\" border\"0\" />
      </a><br/>Pour toute question ou commentaire?<br><b>[ Nouvelle adresse courriel! ]</b>";
    echo '<hr>';
    print '</div class="noprint">';
    LastMod($tplFile); // display date of last modification
  }
if ($Language == "ot")
  {
    echo '<hr>';
    LastMod($tplFile); // display date of last modification
  }
The figure shown below shows the footer of the page with the e-mail icon and the date of the last modification.
 |
Adding a Blog
This site is PHP-driven, it uses embedded tables for its layout and templates to display its content. In this way, the container and the content are completely isolated from one another. In some pages, a MySQL table is used to display content. It is a static web site.
A blog is somewhat different: it is a website that is like a diary or journal. Bloggers often write about their opinions and thoughts. What bloggers write is called posts, which become blocks of writing on the blog. It is essentially dynamic and require some sort of Control Management System (CMS), a software system used to control a dynamic collection of Web material (HTML documents, images, and other forms of media). It facilitates document control, auditing, editing, and timeline management.
Approach
As a first step in the development of my blog, I googled and found two approaches:
- Using Dreamweaver CS3 - it offers a way to use databases to manage the content of a database-driven dynamic website: the built-in Dreamweaver server behaviors, which automate the generation of PHP code for basic tasks, such as querying and updating a database. It allows non-programmers to generate complex software. You give instructions and Dreamweaver generates the code. Easy! The way to use it is based on the following tutorial written by David Power: "Building your first dynamic website – Part 1: Setting up the site and database", "Building your first dynamic website – Part 2: Developing the back end" and Building your first dynamic website – Part 3: Displaying content from a database".
- Using a PHP class called "Blogger" - is a PHP class that connects to a MYSQL database and provides the functionality required to let the user enter/update a comment, store the name of the author, the subject and a comment in the database, read all the previous entries and display them on my Web site. The rest of this section is derived from the work by Alejandro Gervasio in "Defining the Core Structure of a PHP Blogger" [November 21, 2006].
I used both approaches: Dreamweaver to design the blog itself and "blogger" to design the administrative part of the blog. To be frank, I used the motors that they propose but altered the layout of the page.
Page layout
Years back, web developers have used imbedded-tables for laying out Web pages. More recently, developers doing CSS-based layouts have used floats or absolute positioning to avoid using non-semantic HTML <table>s. In this context, I decided to use only <div> and CSS rules for the layout.
The first steps were easy. Use a <div> for the whole page, put a <div> for the menu and put a <div> for the content of the blog and use CSS to color them. The result was not quite what I expected. The page looked like the page below except that the blue column that contains the menus stopped just after the last menu item and did not reach the bottom of the page. The trouble is that divs expand vertically just enough to accommodate their contents.
 |
|
|
I needed a way to display the blog with the blue and the white columns being of equal length as shown above. I found an article entitled "Four Methods to Create Equal Height Columns" that uses the display property of CSS to mimic embedded-table layouts. The CSS-based display:table, display:table-row, display:table-cell etc are all usable today across Firefox 2+, Safari 3+, Opera 9+ and IE8. I used it.
Converting the site to the UTF-8 charset
The characters that display on a computer screen are represented internally as a stream of zeroes and ones; it is their number and their ordering that define the encoding and allow the browsers to interpret them as a sequence of characters. This interpretation is called character encoding: it tells the browser how to pair sequences of bytes in this stream into real characters. The more bits an encoding uses, the more characters it can support.
ASCII is a 7-bit encoding based on the English alphabet. 8-bit encodings are extensions to ASCII that add a number of useful, non-standard characters like é and æ. They can only add 127 characters, so usually only support one script at a time. When you see a page on the web, chances are it's encoded in one of these encodings. The ISO-8859-1 is an 8-bit charset used for european languages (also called "latin1").
Unicode is a standard encoding system for computers to display text and symbols from all writing systems around the world. Unicode-based encodings implement the Unicode standard and include UTF-8, UTF-16 and UTF-32/UCS-4. They are multi-bytes encoding (can use from 1 to 4 bytes), go beyond 8-bits and support almost every language in the world. UTF-8 is gaining traction as the dominant international encoding of the web.
Following the development of the blog and the charset problem that I had to resolved, I decided to convert the whole site to UTF-8.
Transcoding this site to UTF-8
This web site is PHP-driven as shown by the source code of the link that is clicked when a page displays:
<?php ob_start(); // turn output buffering on ?>

<!DOCTYPE html PUBLIC "-//W3C//DTD HTML 4.01 Transitional//EN">

<html>

<head>

  <meta http-equiv="content-type" content="text/html; charset=UTF-8" /> <!-- sets UTF-8 charset -->

  <title>Title</title>
<?php

  $RootDir = $_SERVER['DOCUMENT_ROOT']; 	// path to root folder
  $myIncPath = $RootDir . '/include/';	  // path to include folder
  $LocalMenuString = '';                  // local menu

  $Rate = 0;                              // = 1 => displays a warning

  $UnderConstruction = 1;                 // displays "under construction"

  $Keywords = "";                         // generating <meta NAME="keywords" CONTENT="">

  $Description = "";                      // generating <meta NAME="description" CONTENT="">
  # generating the page

  include $myIncPath . "top.inc.php";		 // generates the page header and template content

  include $myIncPath . "bottom.inc.php";  // generates the page footer
?>
where the meta statement on line 5 has been added to indicate the browser that it has to interpret all the characters on the page as UTF-8-encoded. Obviously, this meta statement sets UTF-8 as the charset of the document but it is not sufficient. All the files used on the site need to be UTF8-encoded too: a tedious piece of work where I used the "Modify" ![]() "Page Properties" menu iin Dreamweaver, selecting "Title/Encoding" and setting it to UTF-8.
"Page Properties" menu iin Dreamweaver, selecting "Title/Encoding" and setting it to UTF-8.
If you don't have Dreamweaver, use a function like
function set_page_utf8($url) {
	if( !($content = file_get_contents($url))) return false;
	$data = iconv("ISO-8859-1", "UTF-8", $content);
	file_put_contents($url, $data);
	return true;
}
Conclusion
As you can see from the layout of the site, readability and simplicity of the content are still the prime movers of the development of this web site. The pages are embedded in a PHP shell that generates the page from the server and provides it with all the capabilities required for navigability (Javascript code) and for multiple layouts (color theme and font size) that the user can select. This capability has required the development of dynamic CSS code that linked with each page in such a way that reload of the page is immediate and reliable.
The only part of this code that is not genuine is the menu which was downloaded from The PHP Layers Menu System. These menus, developed by Marco Pratesi, are driven by PHP and Javascript respectively on the server and on the client computer. I have only modified the CSS file that renders them on the screen.
Annexes
Print preview popup window
As Web pages get more and more complex with images, advertisements, and links all over the place, they become harder and harder for people to read on the screen with the consequence that some people want to print them out. However, a cluttered page on the screen remains a cluttered page once printed so that Web page designers use CSS media types to create one set of styles for display on a computer screen, and another for printing thus producing a printer friendly page.
A print icon has been placed on the page for the user to click in order to produce a print out. The code underlying this icon calls the PrintPopup () Javascript function that opens a popup window and reloads the page with the the URL (the PHP variable $url) of the page appended with the query "q=printme" as its argument
<a OnClick="javascript:PrintPopup('<?php print $url ?>')">
  <img src="/include/images/printer.png" width="32" height="32" /></a>
where the PrintPopup() javascript function is
function PrintPopup(source)
{
	var disp_setting="toolbar=0,locationbar=0,directories=0,menubar=1,";
		disp_setting+="scrollbars=yes,width=800, height=600, left=100, top=25";
  var docprint=window.open(source,"",disp_setting);
}
As shown in the code below, this query switches the cascading style sheet. For normal screen display, gtrolayout.php and print.css are the styles used for the screen and the print out respectively. With this query, the popup window contains the display of the page styled by print.css and preview.css.
print '<link rel="stylesheet" type="text/css" href="' . $myWwwIncPath . 'print.css" media="print" />';
if (isset($_GET['q']))
{
  if ($_GET['q'] == "printme") // signals "print friendly page" popup window
  {
    $Previewing = 1; // so that a printer icon appears on the popup window
    // switch to print CSS for the diaplay on the popup
    print '<link rel="stylesheet" type="text/css" href="' . $myWwwIncPath . 'print.css" media="screen" />';  }
		print '<link rel="stylesheet" type="text/css" href="' . $myWwwIncPath . 'preview.css" media="screen" />';
  }
  else // standard screen display
    print '<link rel="stylesheet" href="' . $myWwwIncPath . 'gtrolayout.php" type="text/css">';
}
else // standard screen display
  print '<link rel="stylesheet" href="' . $myWwwIncPath . 'gtrolayout.php" type="text/css">';
This code switches the style sheets, an idea found in an article entitled 10 Minutes to Printer Friendly Page on Maratz.com. With this popup, the user can see what will be printed (snapshot below).
 |
Note the print button at the top of the popup window. It provides way to complete the print out. It is displayed on the popup but it is not printed.
Arrow icons to the top of page
On the right-hand edge of the pages, triangular icons are used to move the page back to the top. The code that generates them is part of a PHP function where the following statements build the HTML code needed for their display and operation. The code is extremely simple:
$Text  = '<a href="#">'
$Text .= '<div class="arrowup"></div>';
$Text .= '<span>' . $Content . '</span>';
$Text .= '</a>';
return $Text
First, there is the link tag to the top of the page. Contained in this link, there is an empty div with class "arrowup" followed by a span tag whose content is displayed in a tooltip when the link is hovered. The CSS code that follows show how this icon is styled.
#content .arrowup
{
  float: right;
  background-image: url(../include/images/<?php echo $Theme ?>arrow.gif);
  background-repeat: no-repeat;
  height: 40px;
  width: 40px;
}
First, the div is dimensioned 40x40 pixels and filled by the image referred to in the url of the backgrount-image statement. Finally, it is floated on the right-hand side of the page. That's it!